Of course you don’t want grubs in your compost, but you also want to avoid killing the beneficial red worms that create the compost. How can you get rid of grub worms without doing away with your productive red worms? For starters, you might be ok with letting nature take it’s course. Do not treat your compost with chemicals that will kill natural enemies such as ants. These natural predators may help control the problem. Next, you can keep the compost moist enough to keep your red worms alive, but dry enough to repel grub worms. Grub worms prefer very wet areas, while red worms prefer “moist” (not wet) soil.
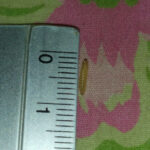
If you are purchasing worms from a retailer, chances are they will not have grubs in them. If you plan to find your own worms, then you should examine the soil and the worms for grubs. Simply sift through the worms and soil to look for larvae. Continue reading to learn more about grubs, what they look like, and how to determine if you have a infestation. You will also find more information below about composting and how to create the perfect compost.
About Grubs
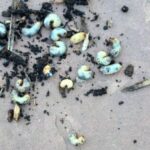
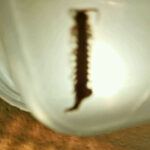
Also known as “white grubs,” grub worms are the larvae of scarab beetles. Grub worms are either white or gray, with a dark posterior abdomen and a brown head. Their longish wormlike bodies curl into C-shape. If you see a grub worm or several grub worms writhing around on your lawn, don’t panic. Grub worms are harmless to humans.
Numerous species of grub worms currently exist all over the United States in most northern and midwestern states, as well as in Florida. Just a few common grubs include the Japanese beetle (Popillia japonica), May-June beetle (Phyllophaga fusca), false Japanese beetle (Strigoderma arbicola), northern masked chafer (Cyclocephala borealis), green June beetle (Cotinus nitida), European chafer (Rhizotrogus majalis), black turfgrass atanius (Ataenius spretulus), southern masked chafer (Cyclocephala lurida), and the Asiatic garden beetle (Maladera castanea).
Grub worms feed on plants and the roots of turf grasses and the adult beetles feed on trees, shrubs, and other foliage. While grub worms are harmless to humans, they can be devastating to crops mainly because they feed on crop roots. Grub worms have three larval stages, with the third being the most devastating to crops. They hatch from eggs laid in soil and they also pupate in the soil. Fortunately, the adults are not considered turf pests.
Its easy to tell whether you have a grub worm infestation or not by the condition of your grass and the types of animals foraging around in your lawn or in your crops. When grub worms feed on grass roots, the grass turns yellow and dies. You will notice scattered brown patches of grass and the grass will pull up very easily. If you notice an increase in birds, moles, raccoons, and depending on what part of the country you live in, armadillos, this may be because you have a white grub infestation. If you notice wasps in large numbers hovering over your grass, this may also be a sign of a white grub infestation.
Before attempting to get rid of grub worms, you can confirm that you have an infestation by digging up the top three to four inches of soil, roots, and thatch. Simply sift through the materials and look for the larvae. If you find them—it’s time to explore treatment options.
About Composting
To create the perfect small-scale worm compost you will need several items including:
·Raw fruits and vegetables
·A shallow container (24″ X 18″ X 8″ should suffice) with a lid
·Moist Leaves
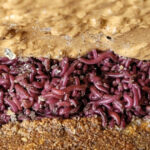
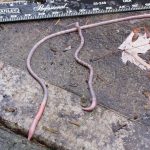
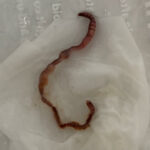
·Worms, preferably red worms such as Eisenia foetida or Lumbricus rubellus
One of the first things you should do when worm composting is to purchase the red worms, if you have not already raised several hundred on your own. Red worms can be purchased from a number of online retailers or at most plant and/or pet stores. Next, wash out the worm composter you are using. If you have a wooden composter, line the bottom of it with sturdy plastic such as a heavy trash bag or shower curtain. Mix the organic materials together and add the worms. It takes roughly 3-5 months for the worms to eat through the materials. At this time, you will notice very little materials and a hefty amount of compost. Once this happens, it’s time to harvest.
Harvesting means: do not add any food to the bin for two weeks. When two weeks has passed, simply move all of the worm bin contents to one side of the bin and remove any large pieces of undecomposed materials. Add fresh materials – leaves, fruits and vegetables, to the empty side of the bin. Over the next two weeks or so, the worms will begin to move to the side where the new materials are located, leaving their compost behind. All that is needed at this point is to remove the old compost and replace it with fresh materials. Cover the new side of the worm composter to encourage the worms to migrate to the new side.
When you are ready to use your fresh worm compost, you can use several methods of extraction, but one method in particular seems to be the most effective. Dump the entire contents of the worm composter onto a large sheet of plastic and make several piles. Once exposed to the light, the worms will quickly bury themselves in the bottom of the compost within 2-3 minutes. After a few minutes, remove the top layer of compost, leaving the worms on the bottom. Once you have removed all of the worm compost, simply collect the worms and return them to the composter.
Worm composting material is ready to use immediately or if you choose, you can store it for later use. Worm compost can be added directly into your potting soil or mixed in with your garden soil as a soil amendment. If you notice a worm or two in the compost, don’t be alarmed. This is fairly common. Worm compost use is not limited to outdoor gardening. Because the odor is not offensive, you can also use worm compost in the tops of indoor plants.
All About Worms is always free, always reader-supported. Your tips via CashApp, Venmo, or Paypal are appreciated! Receipts will come from ISIPP Publishing.
CashApp us

Venmo us

Paypal us

You might also find these guys interesting!
 Hundreds of Plump Grubs in Mulch are Chafer Beetle Larvae
- Pile of Hundreds of Worms in Crevice are Red Worms
- White, Segmented Worm with Pronged Rear is a Beetle Larva
- White Worms With Brown Heads in Light Fixture are Beetle Larvae
- Do Earthworms Transfer Insect Eggs to New Soil?
- Mangled Red Worm in Toilet is a Tiger Worm
- Centipedes Infest Home for Two Years
- Red-brown Bug Found During Rainy Season is a Footspinner


Please advise…. after a few months of warm weather I have lots of small grubs in my worm beds.
Plastic stack trays, I feed mostly coffee grounds and fruit with some bread.
Any info will help.
Thanks.
Francis James Acanfora