Composting with worms or “worm composting,” is the process of using worms to recycle organic material and food scraps into a useful soil amendment called “vermicompost.” Vermicompost is also called “worm compost.”
As worms consume food scraps, the material becomes compost as it passes though the worms body and exits through its tail. The result is a powerful fertilizer that can be used to help grow plants to their maximum potential. Worm compost is such a powerful fertilizer mainly because worms tend to eat nutrient packed fruit and vegetable scraps and their bodies turn the scraps into nutrient-rich compost.
To begin composting with worms, you will need several items including:
·Raw fruits and vegetables
·A shallow container (24″ X 18″ X 8″ should suffice) with a lid
·Moist Leaves
· Worms, preferably red worms,such as Eisenia foetida or Lumbricus rubellus
To begin the composting with worms process you should purchase a hefty amount of red worms. Two pounds, which is equal to around 2,000 worms, should suffice. Red worms can be purchased from a number of online retailers or at most plant and pet stores. Next, wash out the container or bin that you are using. If you have a wooden bin, line the bottom of it with sturdy plastic such as a heavy trash bag or shower curtain. Mix the organic materials together and add the worms. It takes roughly 3-5 months for the worms to eat through the materials. At this time, you will notice very little materials and a hefty amount of compost. Once this happens, it’s time to harvest.
Harvesting means — do not add any food to the bin for two weeks. When two weeks has passed, simply move all of the worm bin contents to one side of the bin and remove any large pieces of undecomposed materials. Add fresh materials – leaves, fruits and vegetables, to the empty side of the bin. Over the next two weeks or so, the worms will begin to move to the side where the new materials are located, leaving their compost behind. All that is needed at this point is to remove the old compost and replace it with fresh materials. Cover the new side of the composting bin to encourage the worms to migrate to the new side.
When you are ready to use your fresh worm compost, you can use several methods of extraction, but one method in particular seems to be the most effective. Dump the entire contents of the bin onto a large sheet of plastic and make several piles. Once exposed to the light, the worms will quickly bury themselves in the bottom of the compost within 2-3 minutes. After a few minutes, remove the top layer of compost, leaving the worms on the bottom. Once you have removed all of the worm compost, simply collect the worms and return them to the composting bin.
Worm compost material is ready to use immediately or if you choose, you can store it for later use. Worm compost can be added directly into your potting soil or mixed in with your garden soil as a soil amendment. If you notice a worm or two in the compost, don’t be alarmed. This is fairly common. Worm compost use is not limited to outdoor gardening. You can also use worm compost in the tops of your indoor plants. And don’t worry, the odor is not offensive.
All About Worms is always free, always reader-supported. Your tips via CashApp, Venmo, or Paypal are appreciated! Receipts will come from ISIPP Publishing.
CashApp us

Venmo us

Paypal us

You might also find these guys interesting!
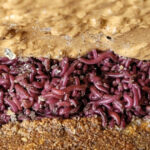
 Pile of Hundreds of Worms in Crevice are Red Worms
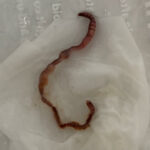
- Mangled Red Worm in Toilet is a Tiger Worm
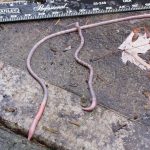
- Segmented Worm is a Black Carpet Beetle Larva
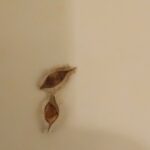
- Pod-shaped Organisms Could be Goldenrod Gall Fly Larva or Plant Seeds
- Do Earthworms Transfer Insect Eggs to New Soil?
- Gray-green Worms on Roof Extension are Crane Fly Larvae
- Gray Tadpole-like Creatures Found Swimming in Hot Tub
- String-looking Worms All Over Clothes and House